
If you haven't yet, be sure to read the first article in this series on the Minority Attack
Q: Do I have to know how to play a minority attack?
A: Yes. Sometimes it's the only option.
Following on from the last article, here is yet another game featuring the Nimzo-Indian pawn structure. Now, from the games in the previous article we might be forgiven for suspecting that a white minority attack with the a-pawn in such structures is always a bad idea. (Human beings have a habit of extracting such rules from limited experience.) Such is not the case. In the following game the use of the same minority attack is well-founded, but the resulting position rather difficult to play (so much so white quickly stumbles). However, nevertheless, the minority attack is all white has by way of a strategic plan should he want to play for an advantage.
Ilja Derjabin - Pavel Tregubov Sochi, 2016:
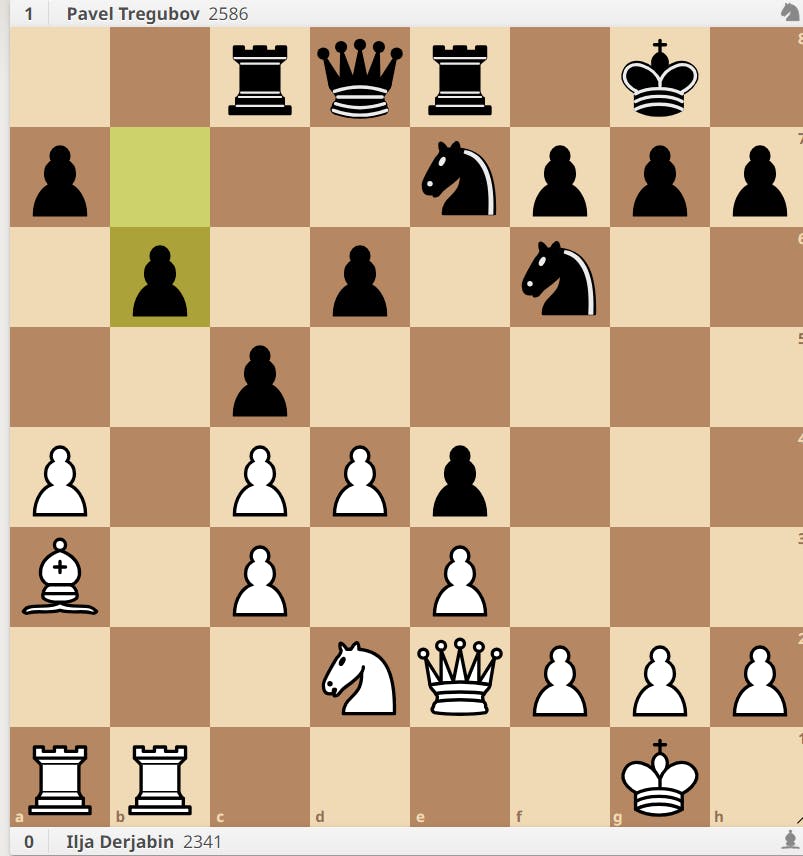
White to move.
Is 17. a5 a good idea? Well, what else is there? Black's pawn on e4 and his knights swirling towards the kingside means a kingside attack is potentially imminent. Here, unlike in Spassky - Fischer, White needs to strike first on the queenside.
17. a5
The position demands it.
17... Nc6. 18. ab ab
Now we can see the problem for white. Everything has gone according to plan, but his pieces (the bishop on a3, for example) are not wonderfully placed to take advantage of the potential weakness on b6. The position is equal, but, practically speaking, it's easier to be black. Black's moves are automatic: he's going to target c4. White's task, on the other hand, of co-ordinating his pieces is a little bit harder.
19. Bc1 Na5 20. Nb3?
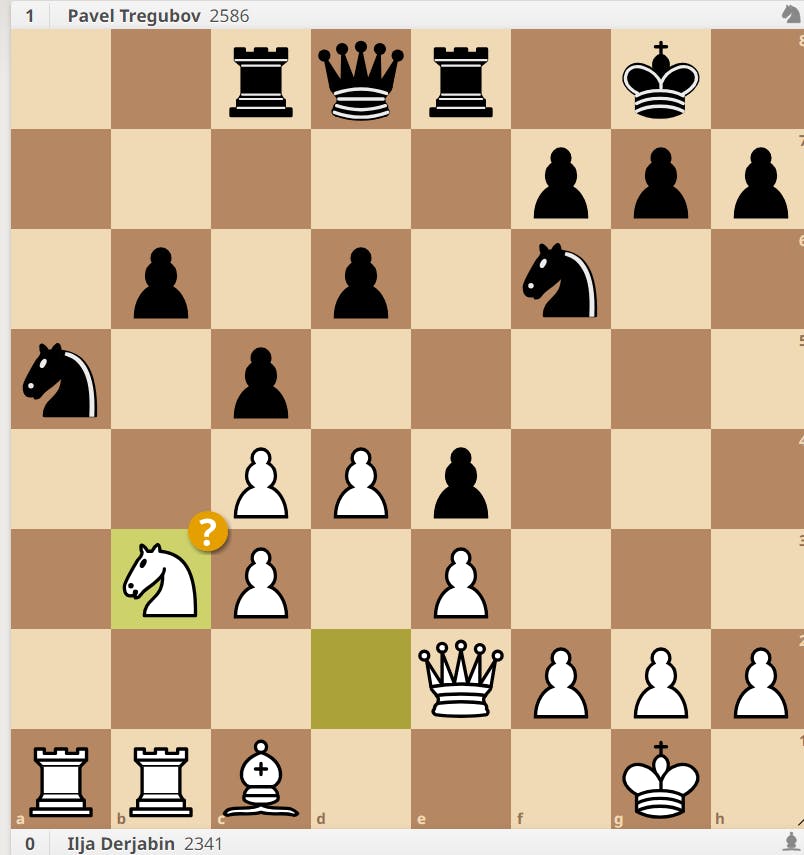
Allowing
20... cd!
Winning the c4 pawn. 20. Ra4 was better but ungainly-looking, making it harder to play. (Frequently, aesthetics, with its innate subjectivity, is the bane of objectivity in chess).
In the same way as in the last game the minority attack can represent the only way to play for an advantage, sometimes it can be the only way to play, full stop, regardless of it conferring no advantage whatsoever. Here is a position from the Flohr-Mikenas Attack as analysed by Kiril Georgiev in The Modern English: Volume 2:
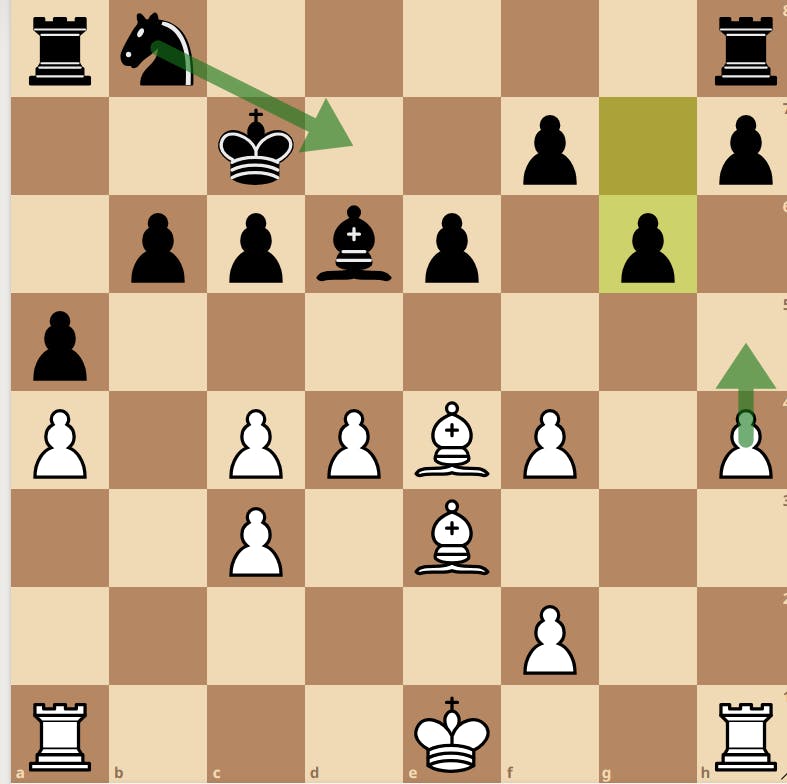
White to play.
'Remember this position! It is a dead draw.' Georgiev counsels the reader. Black has erected a board-wide fortress. The only way into black's position - the h-file - is not a wide enough avenue for white's rooks to infiltrate. Nevertheless, white will play the minority attack with h5 anyway because, well, what else is there to do? Ask the engine, and h5, no matter how futile, is the only move it takes seriously. Besides, should white not push his h-pawn further, there may come a point later in the game where, as with Spassky's disastrous a4 against Fischer, black can play ...h5, secure h4, and target the pawn with his knight and bishop.
Sometimes the minority attack is necessary to keep the balance in a relatively stable position. But it can also be an aspect of an initiative in a position where every move counts. What follows is a strategically lucid and brilliant game, no less so for ending in a draw. Witness how the flexibility of a broken pawn structure allows black to equalise against white's structural advantage.
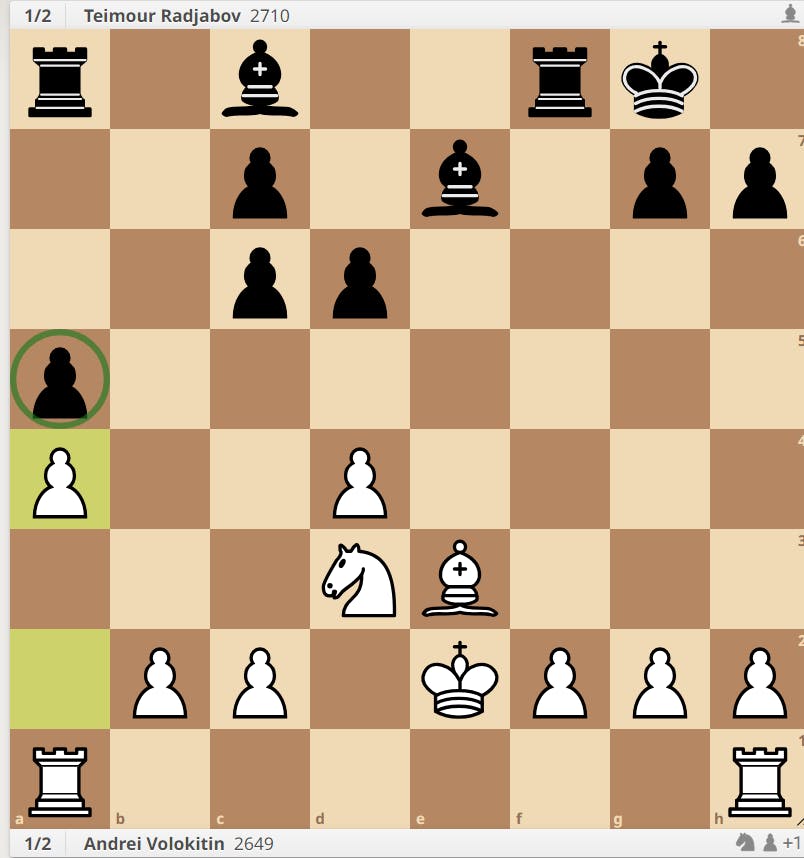
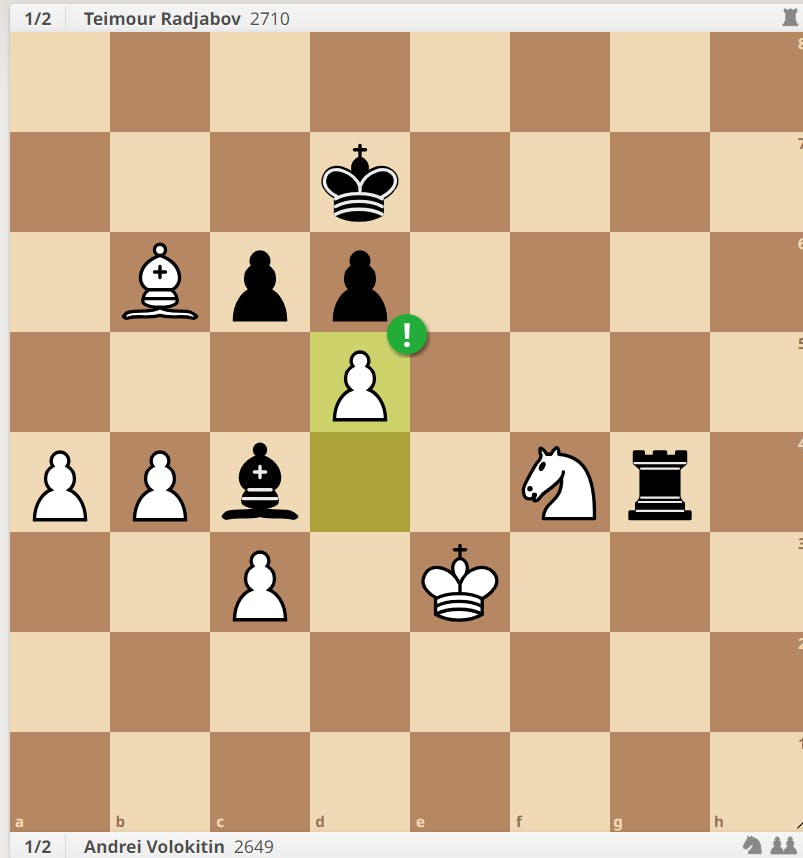
Andrei Volokitin - Teimour Radjabov Doha, 2016. World Rapidplay Championship
1.e4 e5 2. Nf3 Nc6 3. Bb5 f5 4. Nc3 fe 5. Nxe4 Nf6 6. Nxf6 Qxf6 7. Qe2 Be7 8. Bxc6 bxc6 9. Nxe5 Qe6 10. d4 0-0 11. Nd3 Qxe2 12. Kxe2 d6 13. Be3 a5
Perhaps a slightly risky move. Even though it's not a minority attack, pawn moves like 13...a5 are always reminiscent of Spassky's error against Fischer. Here, however, black shows he can live with the fixed weakness on a5 in a way white couldn't live with his on a4 in the earlier game. Besides, the black a-pawn may have ultimately proved weak on a7 anyway.
14. a4
Fixing the a5 pawn.
14... Bf5 15. Kd2 Bf6 16. Rad1 Rab8 17. b3 h6 18. Kc1 Rfe8 19. Rhe1 Kf7 20. Nb2 Be6
Black's compensation for the pawn resides in how he uses his unopposed light square bishop. 20... Be6 not only prevents white from playing Nc4, it prepares ...Bd5. From d5, the bishop can monitor both sides of the board, and prepare the minority attack on the kingside. If black couldn't liquidate the white 3 vs. 2 pawn majority on the kingside with a minority attack he would be a victim of the 'Principle of Two Weaknesses': tied down to the a5 weakness on one side of the board, and a pawn down on the other.
21. f3
anticipating the minority attack.
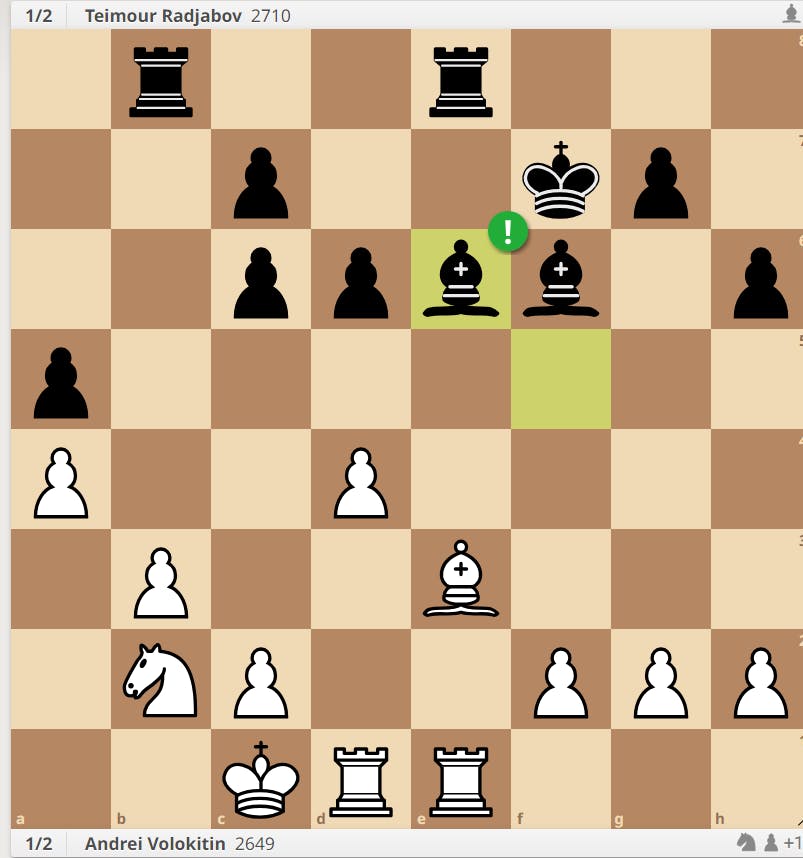
21... g5
And here it is.
22. Bf2 Bd5 23. Rxe8 Rxe8 24. Re1 Rg8!
Exchange one set of rooks, but not both. Black needs at least one rook remaining when the minority attack lands, or it would be both harder to capture the shattered pawns, and easier for white to win a5.
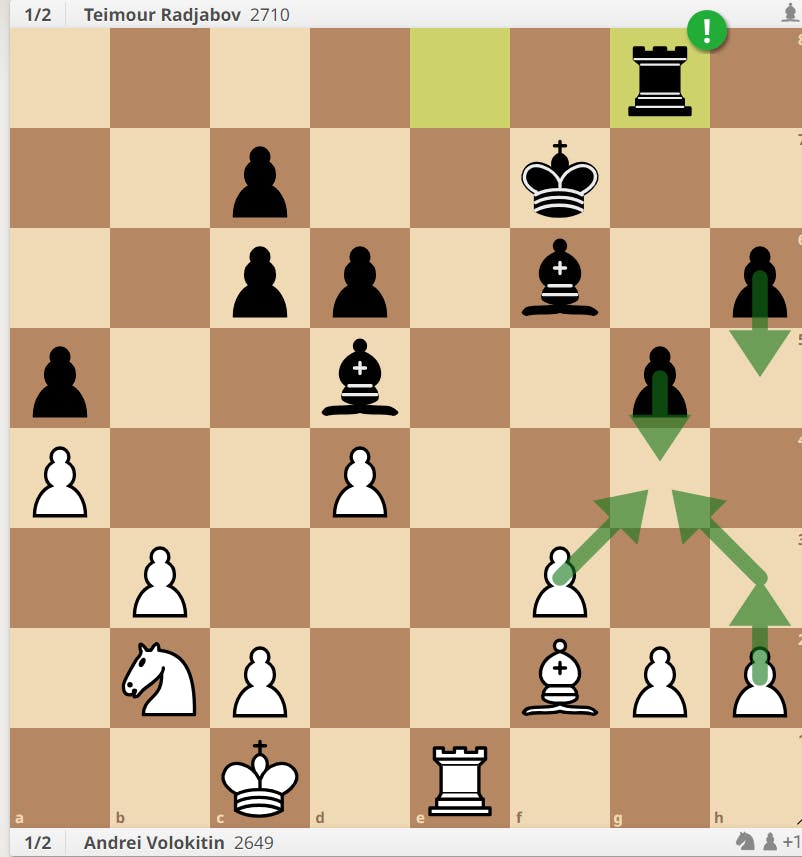
25. h3 h5 26. Nc4 g4 27. hxg4 hxg4 28. Nxa5 gxf3 29. gxf3 Ra8!
Black doesn't mindlessly grab the pawn on f3. Instead, he paralyses white's queenside first. The knight is now temporarily marooned on a5.
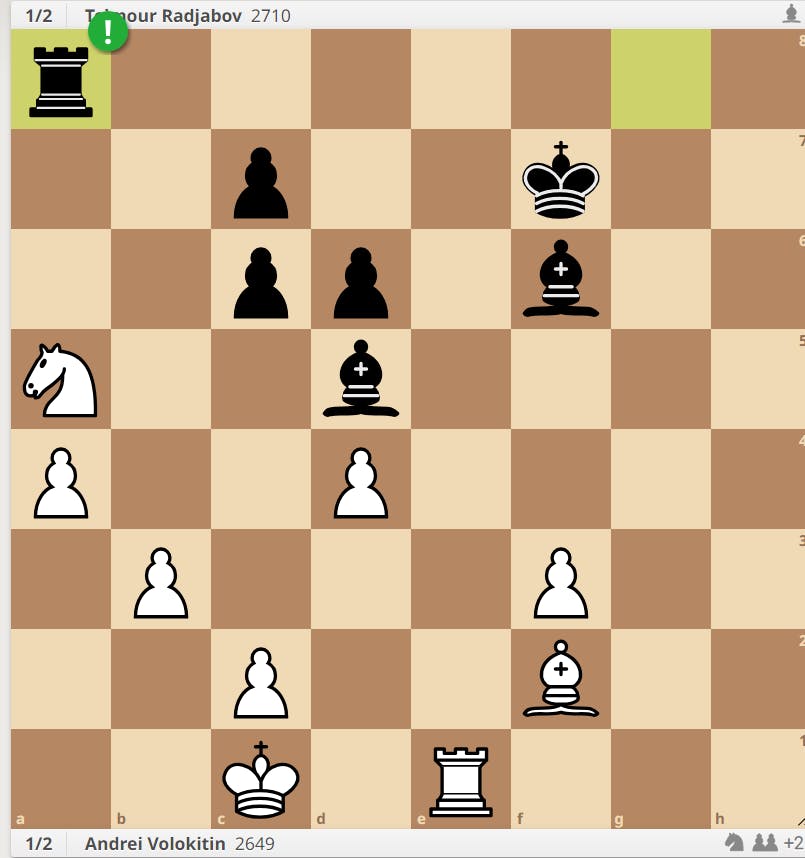
30. b4
Forced, but making a4 weak and white's pawns inflexible. When the final pawn disappears on the kingside, the passed a-pawn no longer really matters as long as black controls the light squares in front of it with his bishop.
Bxf3 31. Kd2 Bd5
A balanced position with a distinct imbalance of forces has been reached. White is a pawn up but immobile. Black's enduring activity means that his position is easier to play.
32. Be3 Be6 33. Rf1 Kg6 34. Rg1+ Kf7 35. Rf1 Kg6 36. Rg1+ Kf7 37. Rh1 Kg6 38. c3 Bd7 39. Ra1 Rh8 40. Rg1+ Kf7 41. Rg2 Rh1 42. Rf2 Kg6 43. Nb3 Bf5 44. Nc1 Bh4 45. Rg2+ Kf7 46. Bf2 Bh3 47. Bxh4 Bxg2 48. Bd8 Bd5 49. Bxc7 Rh2+ 50. Kd2 Rh3+ 51. Kd2 Rh2+ 52. Kd3 Ke6 53. Ne2?
53. b5 holds the balance, according to stockfish.
53... Kd7 54. Bb6 Rh3+ 55. Kd2 Bc4 56. Nf4 Rh4?
Missing a chance to win with 56...Rf3.
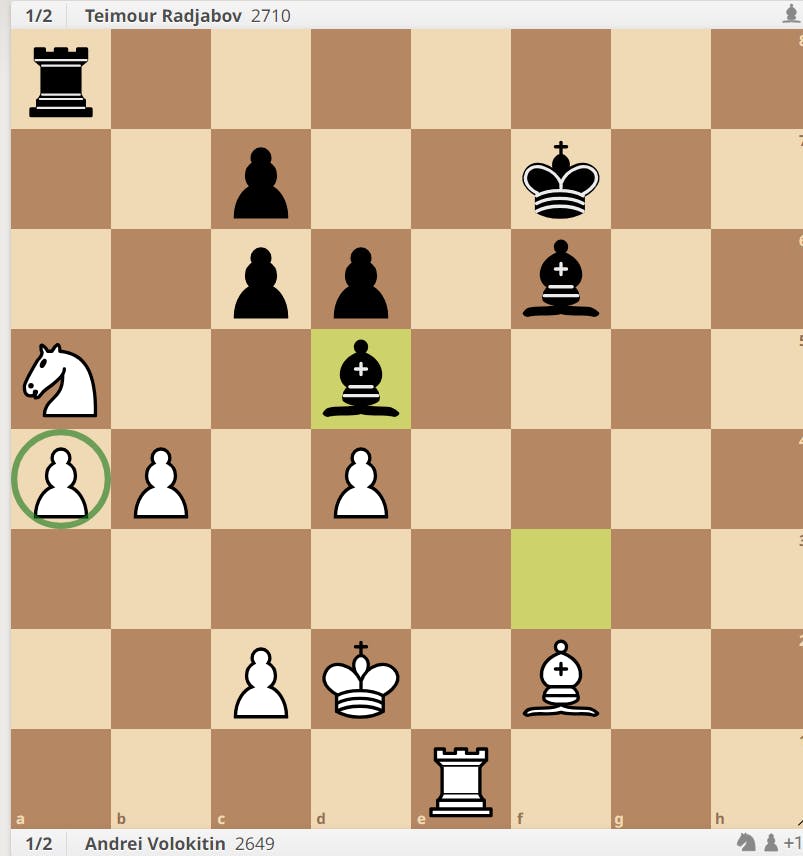
57. Ke3 Rg4 58. d5!
The pawn sacrifice here is just the easiest way to emphasise the pointlessness of continuing.
59. Bd4 Rg1 60. a5 Kc6 61. Kf2 Rf1+ 62. Ke3 Kb5 63. Nb3 Rf8 64. Nf4 Ka4 65. Nh5 Re8+ 66. Kf4 Re8+ Draw
A great game, made all the more amazing for it being blitz.
This completes our short exploration of when the minority attack either goes wrong or is essential. In the next and final article we'll look at the connection between the minority attack and specific openings.