
Blackadder: Am I jumping the gun, Baldrick, or are the words "I have a cunning plan" marching with ill-deserved confidence in the direction of this conversation?
Baldrick: They certainly are, sir!
Blackadder: Well, forgive me if I don't jump up and down with glee. Your record in this department is hardly 100%. So what is it?
Baldrick: We do nothing.
Blackadder: Yep. It's another world-beater.
'Nob and Nobility', Blackadder the Third
In 'Do Something ?!' we witnessed the will to victory cause the lower rated player to utterly neglect their higher rated opponent's defensive resources. Now we'll look at positions where by recognising the limits of our own resources we can make it as difficult as possible for the higher rated opponent to win. Once we come to terms with the reality that there's little by way of positive action we can take in a position, the solution is simple but not obvious: we do nothing. I say not obvious because 'doing nothing' is not why we play chess. And yet not only is doing nothing effectively possible more often than we might think, it's sometimes the best option.
Which leaves the question of 'how?' to do nothing effectively.
Perhaps the best pieces for doing nothing are the rook, the king, and the bishop. (Pawns are the worst - don't touch them. Leave them well alone.) We'll focus more on the bishop next time, but in the meantime we'll examine the capacity of rooks (and kings, their silent partners) to frustrate their counterparts by doing nothing else but holding the defender's position firm. Seldom is it stressed that when in a slightly inferior position we are entitled to ask our opponent to make their own decisions, rather than leave them an obvious (no matter how narrow) path to victory by our own pursuit of counterplay.
Active Rook vs. Passive Rook
Key to understanding what we're about to look at is to first appreciate the theme of the active rook vs. the passive rook. When we're first introduced to rook and pawn endings, the instructor (usually a club veteran) will stress that an active rook - one that attacks - is preferable to a passive rook - one that only defends.
From an 1886/7 inter-city correspondence game between London and St. Petersburg:
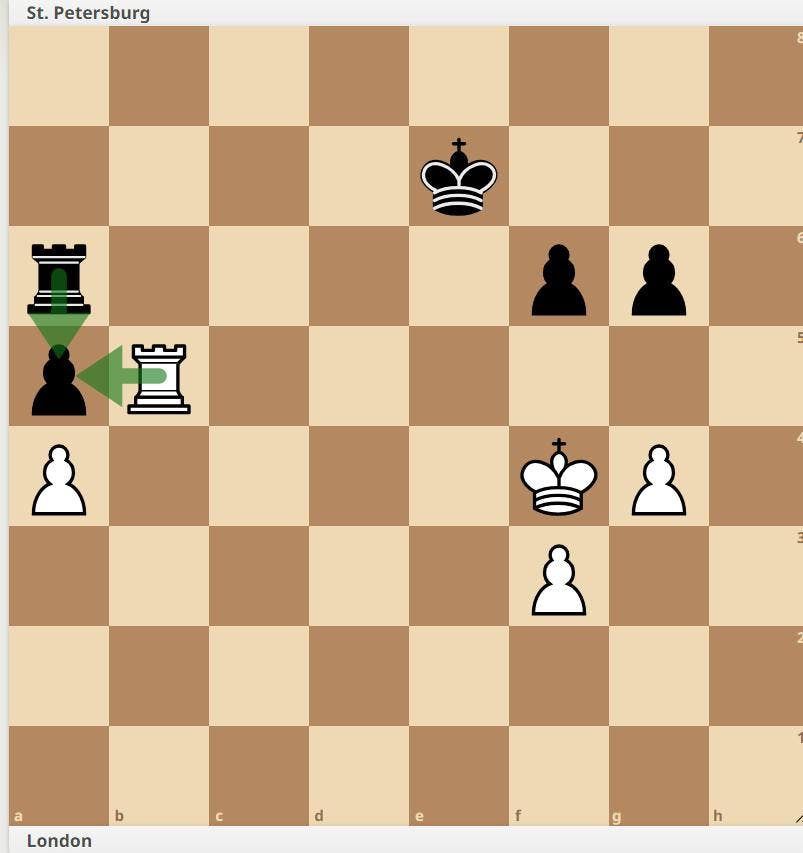
The two rooks appear to cancel each other out in their attack and defence of the a5 pawn. However, the white rook is potentially superior to the black because its being active allows white to move it. Whereas the black rook must remain on the a-file until white stops attacking a5. Consequently, perhaps slight paradoxically, in the above position the strongest move for black is to activate their rook by giving up the pawn with:
... Rc6!
and aim for a variation on the Vancura position (below).
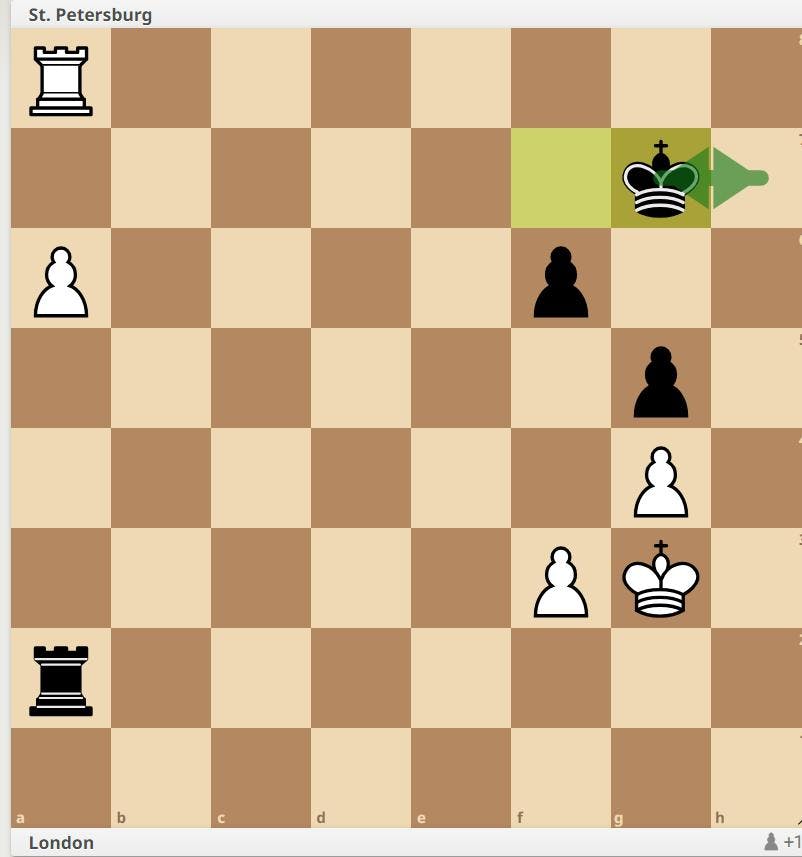
which is a draw, as white cannot extract his now passive rook from in front of the a-pawn without losing the pawn. QED: activity is a must in rook endings. And it can be worth sacrificing a pawn - sometimes even two - to activate a passive rook.
Ok, that is what we're taught, but it's not the whole story. If we take the quest for activity above all else as holy writ we blind ourselves to the inevitable nuance we find in all areas of game.
If most learning is unlearning, then what follows bears out this truism. 'Doing nothing' seems counter-intuitive because what we consider to be intuitive is what we learn that then becomes intuitive. The insistence on activity belies the reality that not only is passivity not often not a permanent state, it is often vital in defence. Sometimes you have to make your rook passive to preserve equality. You have to make two rooks cancel each other out. And when you have the passive rook, you frequently have to be prepared to wait for your opponent with the active rook to move their piece and thus free your own. If they don't, then maybe the position remains equal.
To do nothing successfully we need to abandon the image of stasis as the perpetual enemy of good chess. Especially when faced with the additional pressures of playing a higher rated opponent.
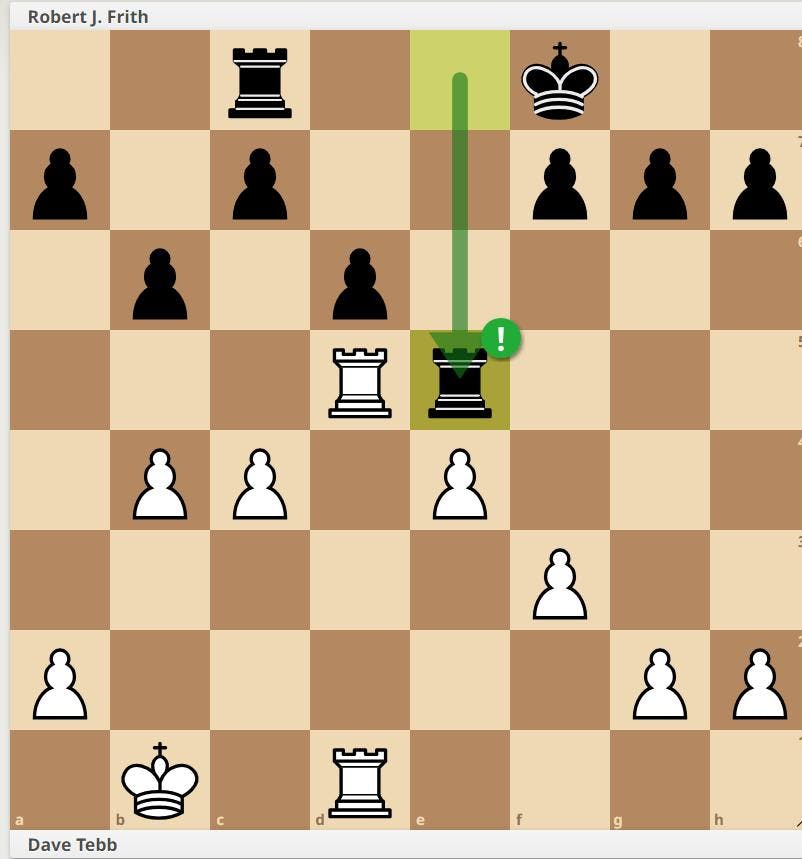
Dave Tebb (approx. 2150) - Rob Frith (approx. 2000) Merseyside League division 2, 2011
In this game, white outrated black by about 150 elo points. Black misses a great opportunity to do nothing.
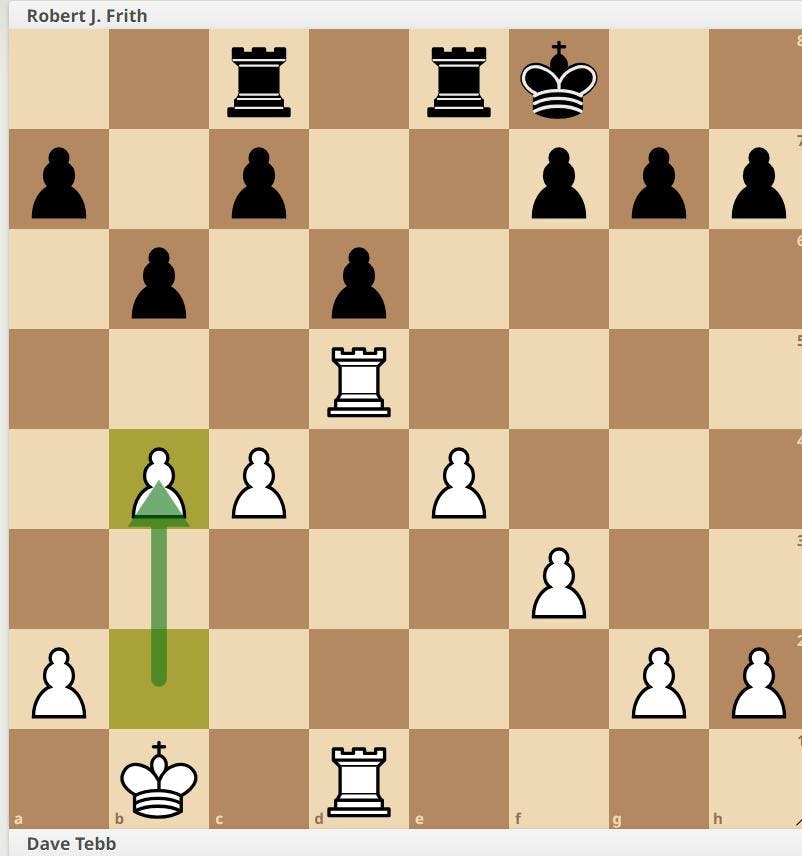
Black to move.
From white's perspective (the higher rated player), this would be a slightly promising position. No more, no less. White would recognise that should black refuse to co-operate, it's a long, hard road to potential victory ahead of him. After 25. c5, then what? He would be reliant on black refusing to sit tight and instead go looking for activity, thus effectively making all white's decisions for him.
From black's perspective matters are a little different. The squeeze is on. White is threatening c5 and damage to black's pawn structure. The conventional wisdom might be for black to activate his rooks and pursue counterplay. Which black does, at the cost of a pawn.
24... a5?
This game and the following example could also be used to illustrate the folly of pushing pawns in such situations. Unlike rooks, pawns can't go backwards.
25. Ba ba 26. Rxa5 Rb8+ 27. Ra1
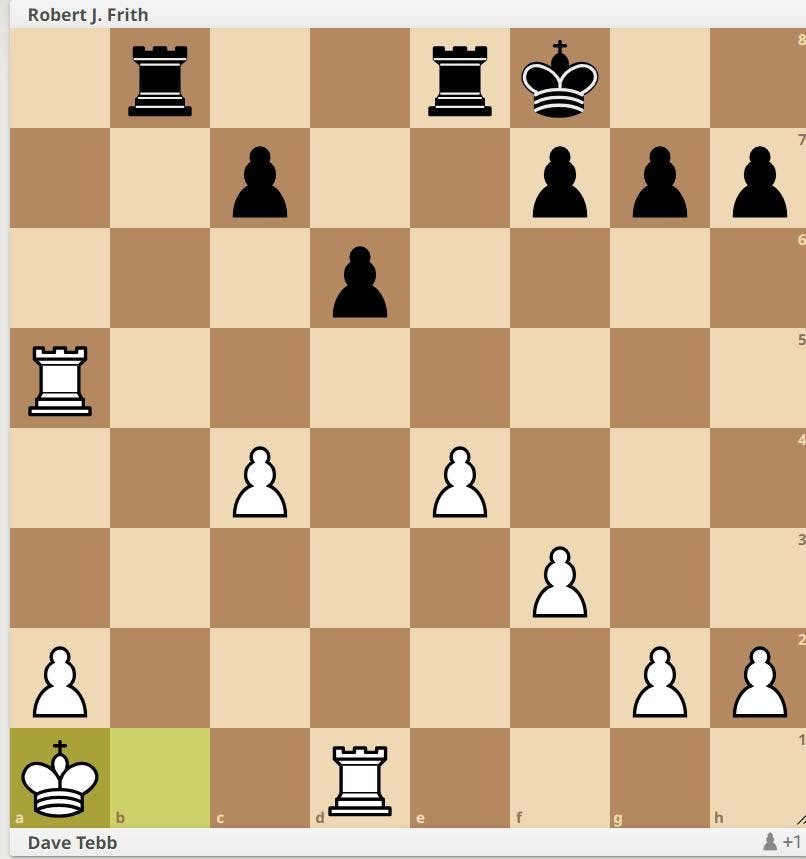
Black has successfully activated his rooks. But white is a pawn up, and his rooks are also active. From the position we joined the game, this outcome is precisely what the higher rated player desired: all the pressure is off him, as all his decisions have been made for him. Black retains some drawing chances, but he's up against it. In the above position the engine has it as +1.1. Keep that in mind.
To return to the original position. black also has a 'do nothing' option:
24... Re5!
Which feels wrong, as after
25. RxR de 26. Rd5
Black has a weakness on e5 and seemingly one also on c7. (see: the Principle of Two Weaknesses). To protect them both he would need to make his rook passive.
26... Re8! =

Which he absolutely should! The two weaknesses at c7 and e5 are too close together to constitute a real problem. The rook can defend both from e7. It just can't do anything else. But why would it need to do anything else?
Intriguingly, stockfish calls this +0.9, putting black at a similar disadvantage as after 24... a5. However, play it out in any direction and that evaluation starts creeping down to close to anywhere from +0.5 to 0.00, because for all white has the space and the active rook he has no obvious way to put black under any real pressure:
Stockfish calls this slightly better for white, but without offering any constructive ideas as to how to win it. How does white make progress if black merely repeatedly moves his king from e7-e8 and challenges white to break through?
Notice that in both of these lines, the active rook is as static as the passive rook. They cancel each other out.
Roger Williamson (approx. 2200) - Steve Carr (approx. 2100) Merseyside League, 2015
Sometimes declining the opportunity to do nothing can be the beginning of a long end.
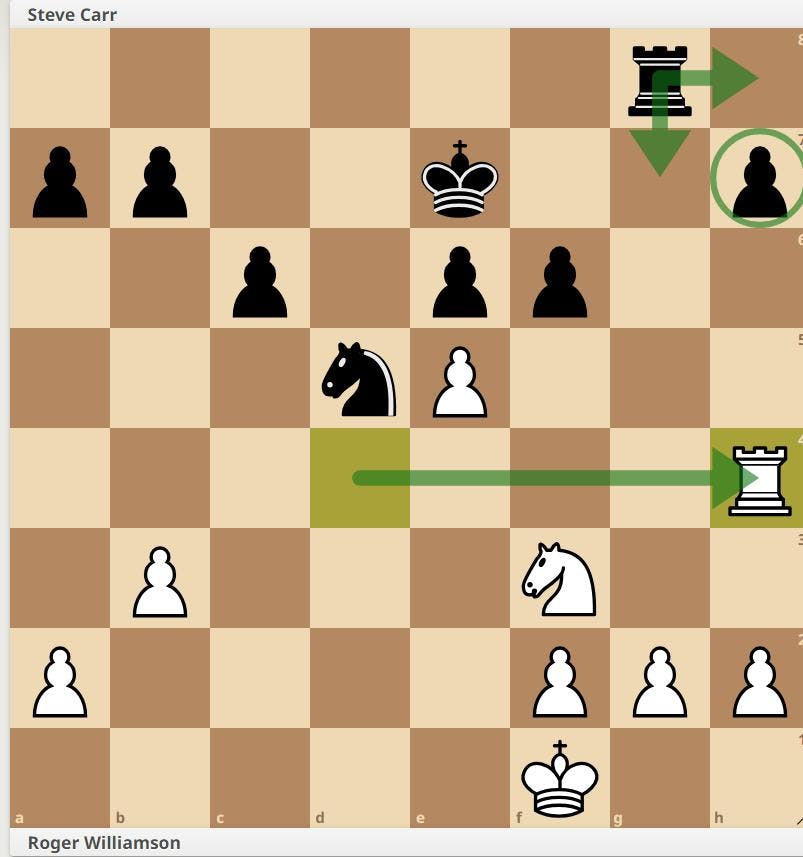
Black to play.
White has just played 26. Rh4 to threaten the weak pawn on h7. Black has a choice to make: 26... Rg7 or 26... Rh8. Again, conventional wisdom might ask he rule 26... Rh8 out on the grounds of passivity alone. But ... Rh8 is the slightly better move, as no matter the rook on h8 would be the quintessentially passive rook of diagrammatic explanation, it would defend h7 while also retaining the right to dash over to the queenside to defend the pawns there should they come under attack.
After 26... Rh8 white would be pretty much out of ideas. He can't force black to give himself a second weakness on the kingside. So what harm could he possibly do? One weakness isn't enough to win.
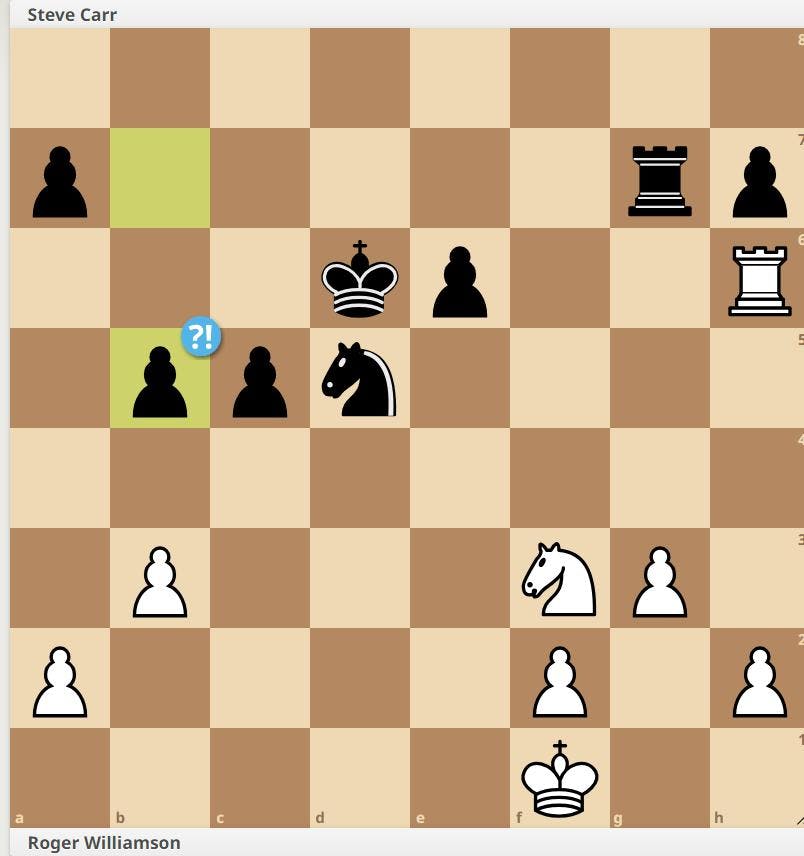
26... Rg7?!
Not in itself a terrible move, but indicative of the beginning of a drift towards an inferior position. ... Rg7 is explicable enough: black wants his rook to be active. From g7 it 'attacks' g2. But as white wants to play g3 to take the f4 square away from the black knight, this is no achievement at all. The rook would be better on the 'do nothing' h8 square.
27. g3 fe 28. Nxe5 Kd6 29. Nf3 c5?!
The drift continues. Again, not a dreadful move, but one that suggests a desire to do something rather than an equanimity in accepting black has a practically unwinnable position. Black intends to push the queenside majority and create an outside passed pawn. However, black pushing queenside pawns, and thus potentially creating a second weakness there, is really the only hope white has of winning. Were black just to concentrate on protecting h7 the game would almost certainly be a draw.
30. Rh6
White waits and hopes black will self-destruct. He won't push pawns unless he has to.
30... b5?!
And again.
31. a3 a5 32. Ke2 Ne7 33. h3
Preparing an eventual g4 to keep the knight out of f5 and permit the rook on the h-file access to the queenside.
Nf5 34. Rh4 b5??
The drift ends in calamity.
35. a4 +-
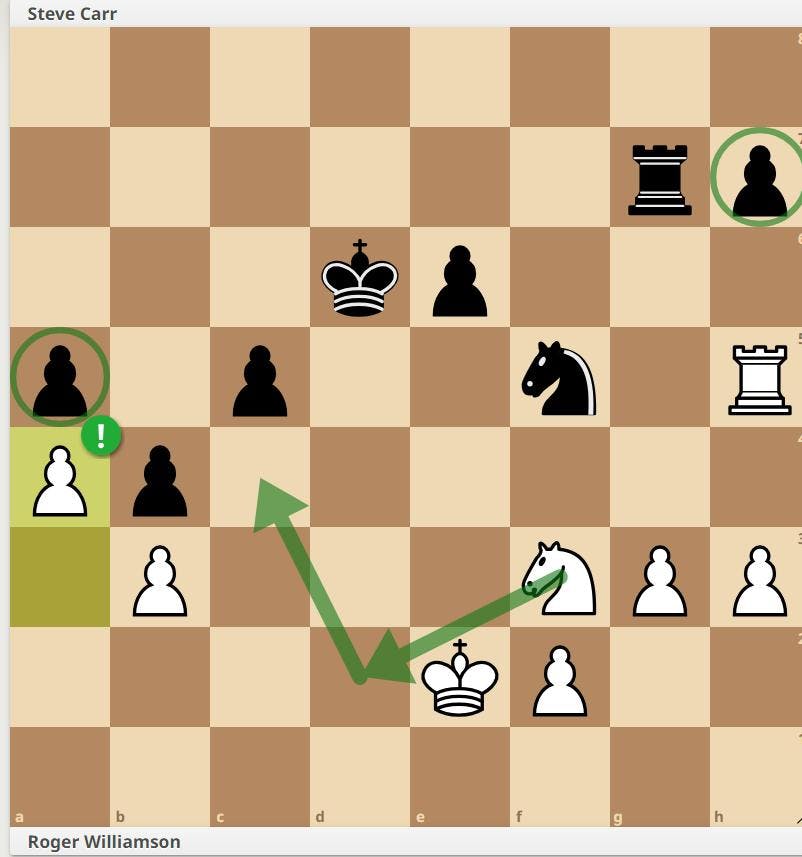
Black has a fatal two weaknesses - a5 and h7, wide apart - and his position is horrible. All for the want of doing something rather than nothing.
Gary Quillan (2411) - Roger Williamson (2212) Merseyside League, 2023
It can happen that in an otherwise equal position where one side is dictating terms, the defender can be presented with two equally viable options: he can do something (defend actively) or do nothing (defend passively). Which is better? Providing the one you choose gets the job done, it really doesn't matter.
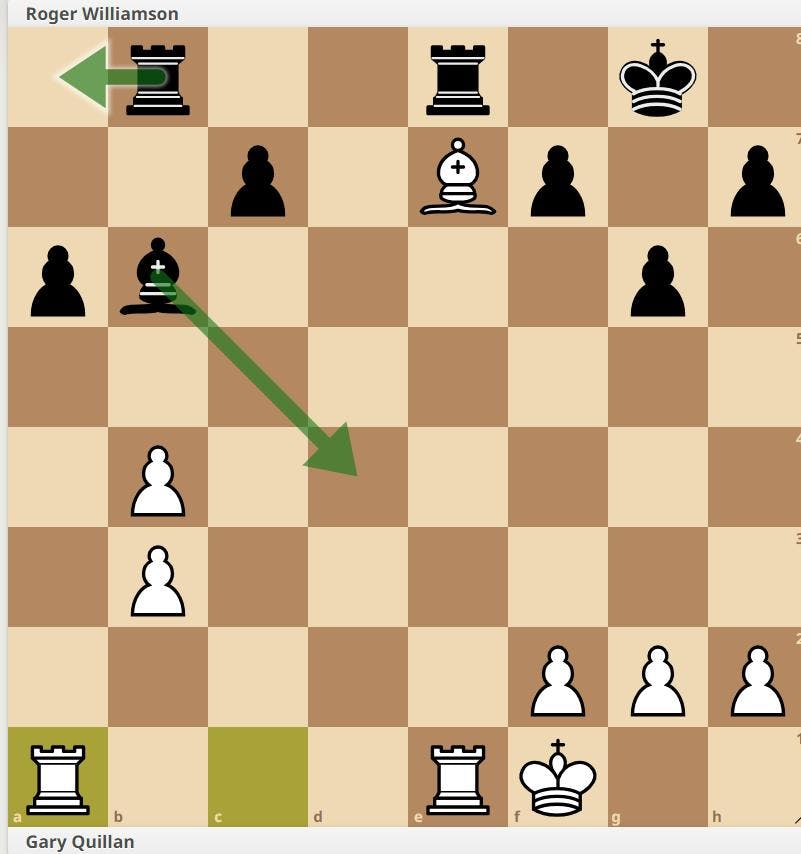
Black to move.
White has just played 23. Ra1 to attack the pawn on a6. Black has two choices:
a) 23... Bd4! 24. Rxa6 Bc3 and now a further fork
a1) 25. Re2 Bxb4 26. Bxb4 Rxe2 27. Kxe2 Rxb4 = Which I didn't really look at, and
a2) 25. Re4 Rbd8! = Which I was convinced was a draw.
b) 23... Ra8 = The do nothing choice.
I chose b), as I feared I hadn't adequately calculated a) - which I hadn't - and believed b to be good enough. a) may lead to a quicker draw, which might make it practically (objectively?) better, but b) leaves white in search of something productive to do.
23... Ra8
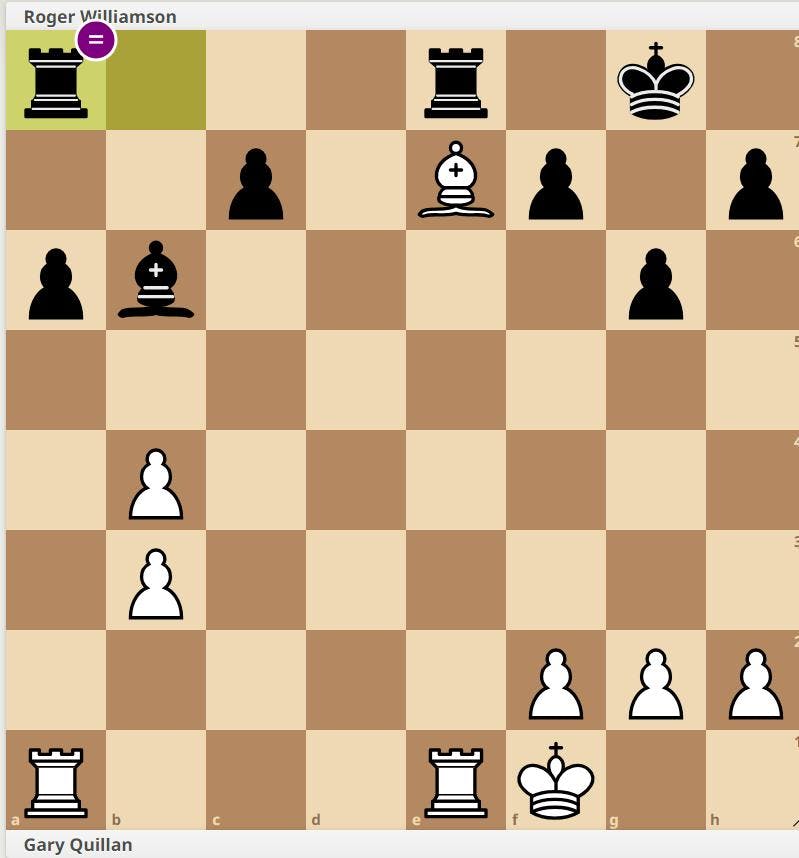
24. Bf6 Rxe1+ 25. Rxe1 Kf8 26. f3 c6 27. Rc1 Rc8
The rooks cancel each other out.
28. Rc4
The standard idea of using the fourth rank to try and pressure the kingside pawns.
28... Ke8 29. Re4+ Kf8 30. Rh4
And once again black faces two choices

30... Kg8
Do nothing.
31. Re4 Kf8 32. Ke2 Bd8 33. Bc3 Be7 34. Kd3 c5 =
Liquidating the weakness at c6
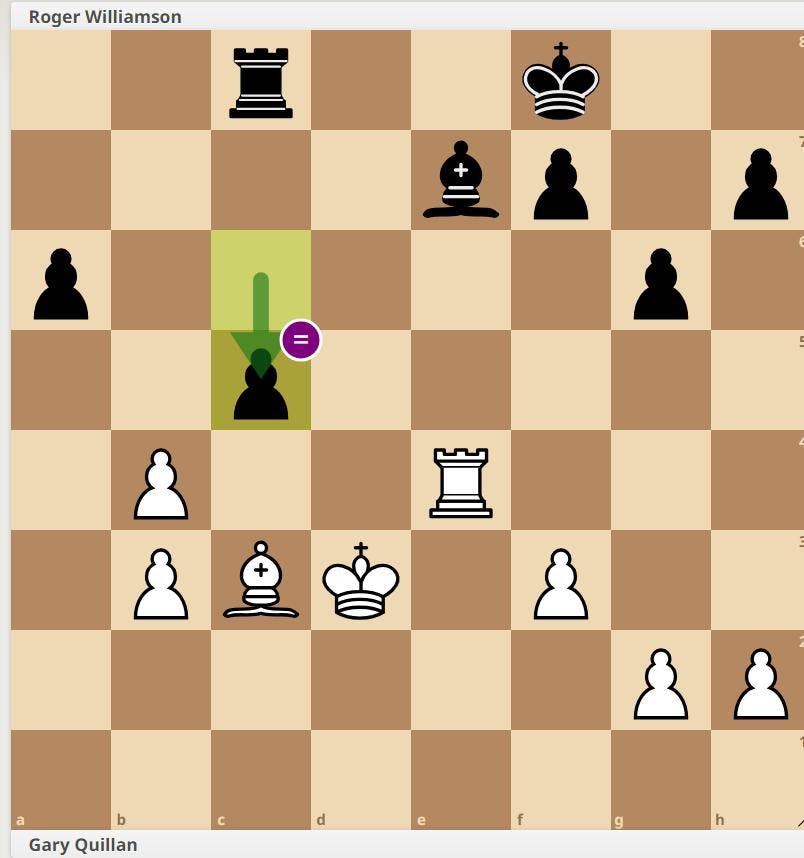
And a draw approaches.
Do nothing. Easier said that done. But you need to be able to do nothing as well as something. Hopefully this has helped identify when doing nothing is a good option and when choosing between doing something or doing nothing is the critical decision you face. Baldrick wasn't always wrong.
Next time we'll look at 'doing nothing' as a way of playing the entire game vs a higher rated opponent.