
The aim in chess, as in many areas in life, is to put our carefully laid plans into action. But while in life we must reckon with circumstances beyond our control, contingency, in chess that role is played by our opponent. They get to plan too. So where exactly is the line drawn between planning and prophylaxis (preventing our opponent's plans)? Chess literature can be a little confusing on this matter. In his classic How Not to Play Chess, Eugene Znosko-Borovsky tells us
Do not think too soon about what your opponent can do; first get clear what you want to do... You will have noticed so far we have given no consideration to what our opponent can do. And this is right, for we must first get clear in our mind what our general plan is to be.
Fine. But no less than Garry Kasparov himself tells us instead that the 'highest art' of the chess player 'lies in not allowing your opponent to show you what he can do'. Which suggests prophylaxis is the be all and end all of the game. So where do we go from there?
The truth is that there is no line between planning and prophylaxis. It's a symbiotic relationship: one can't be done without the other, and the latter is merely an aspect of the former.
Let's start with what appears to be an exception to this rule.
Arshak Petrosian - Laszlo Hazai Schilde, 1970
Here, black, with a useless bishop and a terribly weak pawn on a5, has just played 45... Qb6, setting an ingenious trap by offering up his queen to white's knight.
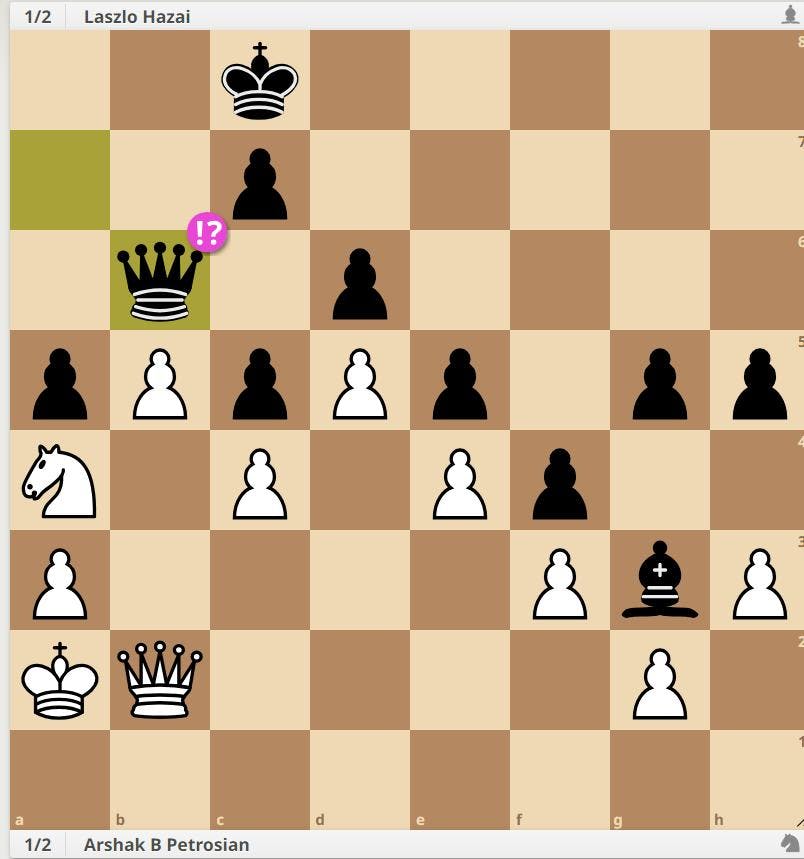
White duly fell into that trap and took the queen with 46. Nxb6, only to discover that the repair done to black's pawn structure after the recapture 46... cb his own queen was now shut out of black's position across the board.
White's queen and black's bishop are no better than pawns. White then plays 47.h4 (the only hope) and black responds 47... gh. Whatever white plays is then met by 48... h3!, and the h-file will shortly be blocked forever. Draw.
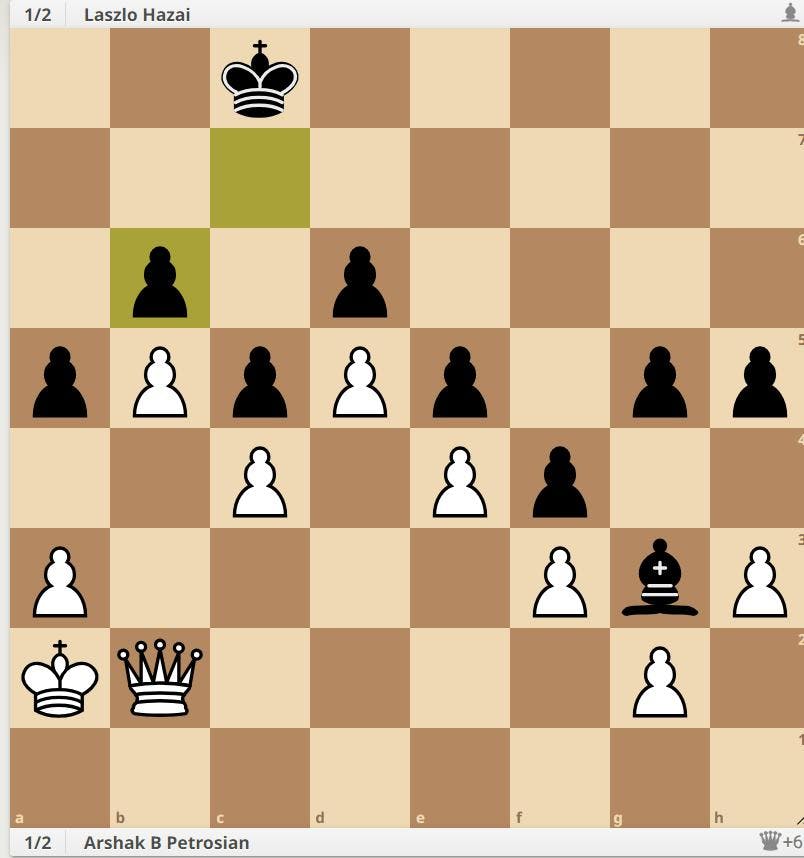
However, if we go back to where we started and try to formulate a better plan for white, we can see that instead of taking the queen, white can just gang up on the weak black a5 pawn with queen, knight, and king. Black can only defend it with his king and queen. After 46. Qd2 Kb7 47. Nb2 Qa7 48. Kb3 Kb6 49. Ka4 the knight reroutes itself via b2-d3-c1 to b3 and white wins the pawn. White can come up with such a long plan because black has absolutely no counterplay. There is no need for prophylactic thinking.
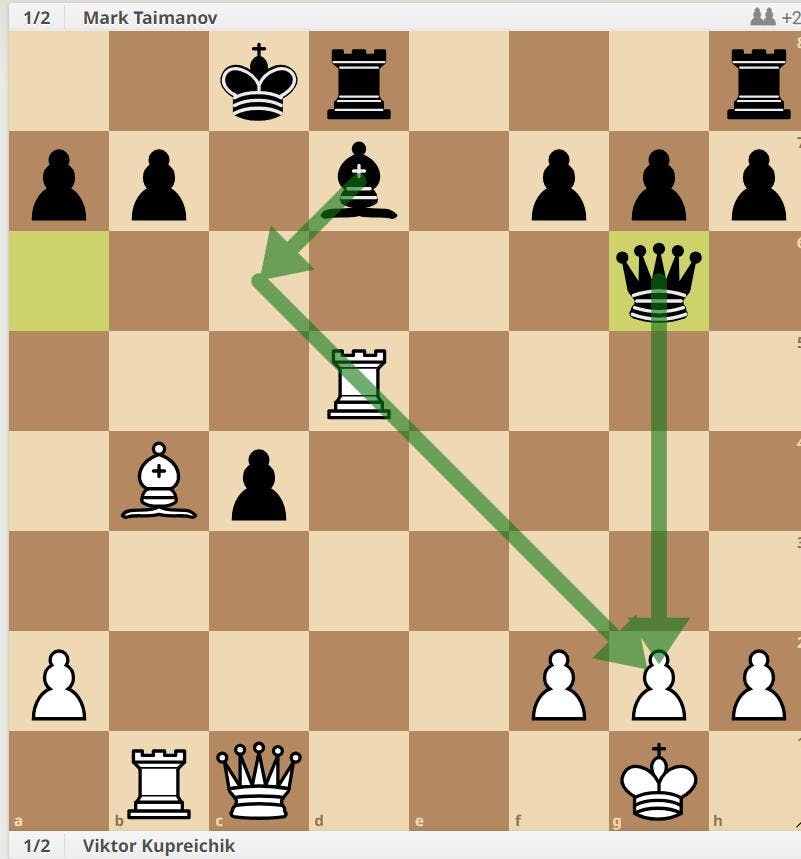
Now, let's go from one extreme to the other: one of my favourite games, Viktor Kupreichik - Mark Taimanov Tbilisi, 1976.
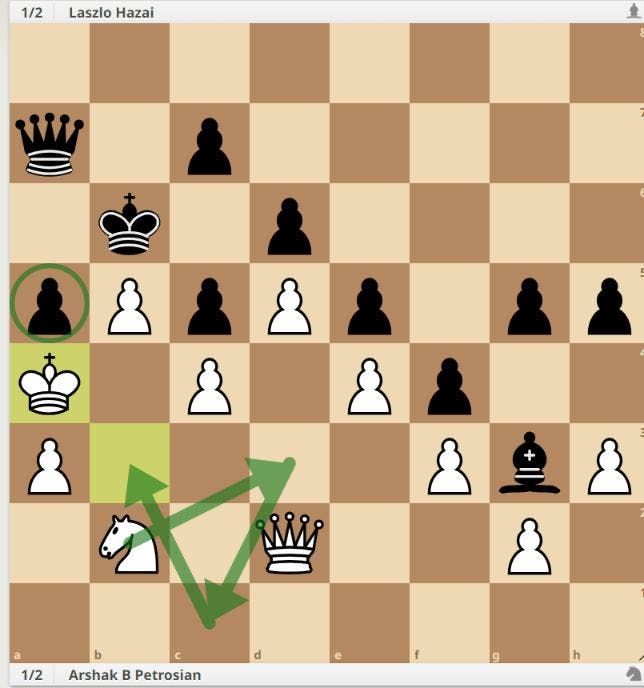
White is two pawns down, but the opposite colour bishops and queens means that whoever takes the initiative first will get a potentially decisive attack on the opposition king . Now, if we know that means we have to sacrifice pawns to open lines to black's king, and also to gain greater access to the dark squares for our unopposed dark square bishop, we might come up with 16.d5!. Really, though, 16.d5! is the only move for prophylactic reasons. If white plays any 'sensible' move other than d5 then black will play 16... Be6 and prevent white from playing d5 with a little prophylaxis of his own. The game continued 16... ed 17. Rb1 0-0-0 18. Bb4 Qa6 19. Rxd5 Qg6
White to play.
Black is threatening to play 20... Be6 and threaten g2 with both queen and bishop. 20. Rg5 doesn't look good enough for white on account of 20... Qe4 followed by ...Bc6, giving black both a solid position and the means to take over the initiative. What is white to do?
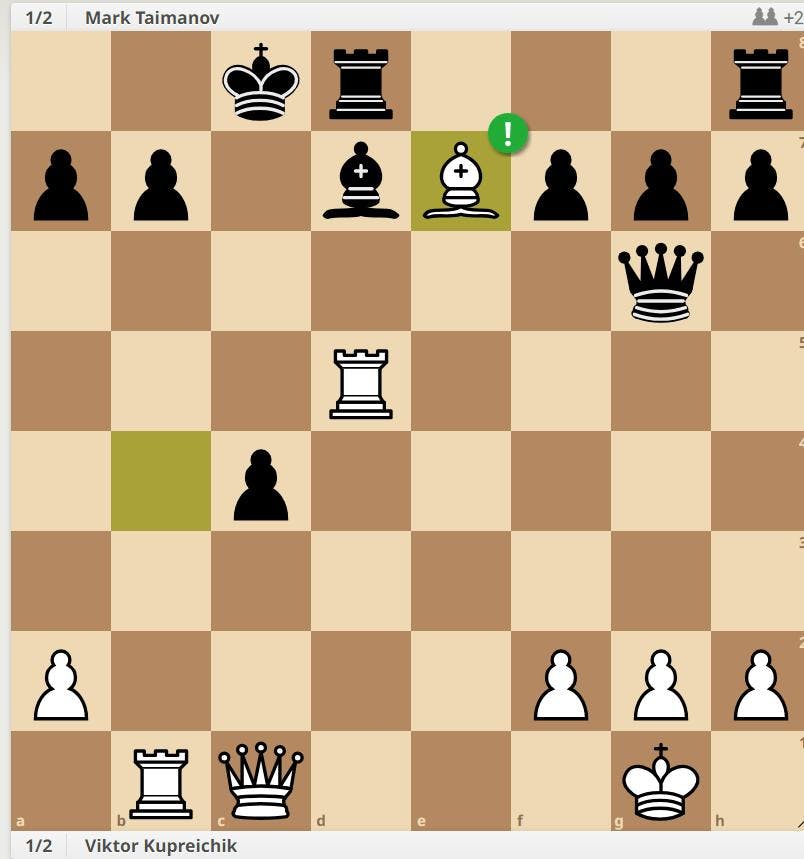
20. Be7!
20. Be7! Is a two-sided move. Not only does it attack the Rook on d8, Be7 also reserves the option of 21. Rg5. It's both attack and defence, forward planning and prophylaxis. After 20... Rde8 white then played the exchange sacrifice 21. Rxd7!
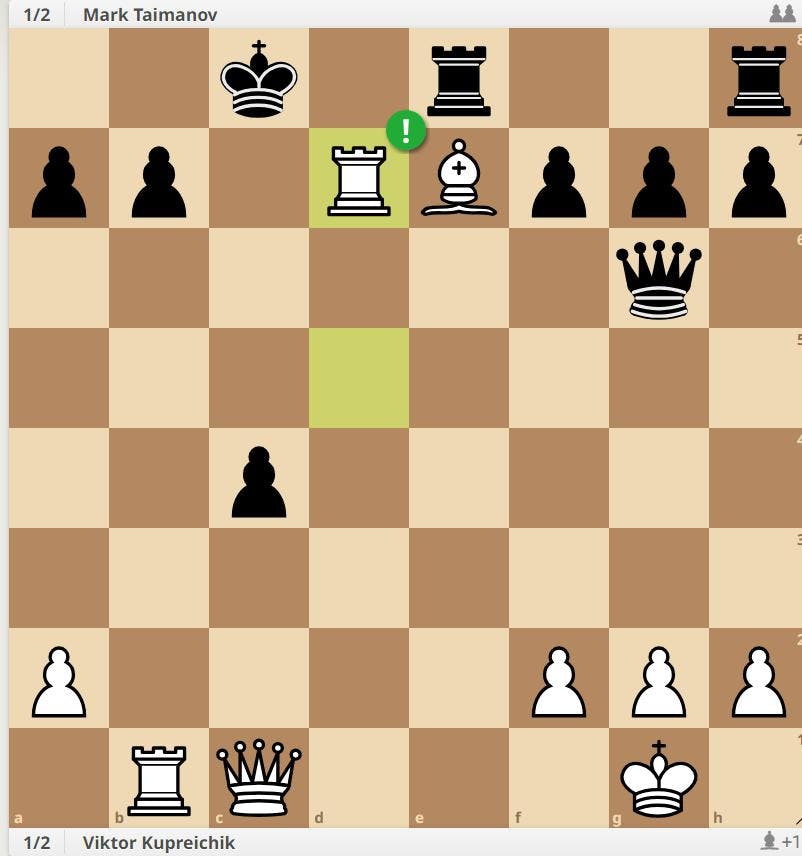
and the game hurtled towards a previously unlikely draw: 21... Kxd7 22. Rxb7+ Kc8 23. Rxa7 Qb6 24. Qxc4+ Kb8 25. Rd7 Qb1+ 26. Qf1 Qxf1+ 27. Kxf1 Kc8 28. Ra7 Kb8 29. Rd7 Kc8 30. Ra7 Kb8 0.5 - 0.5
Chess can throw up situations where one side has an initiative that despite what we might think that term means - attacking - is instead prophylactic in nature. On those occasions, we should be thinking primarily about what our opponent is planning and use our advantage in time (that's time in the game, on the board, rather than on the clock) to prevent it. In the following game, Black's initiative - compensation for a pawn he gambited in the opening - resides in his unopposed light square bishop. Rather than use that bishop to attempt to force an advantage, black instead uses it to put out the flame of his opponent's extra pawn before it becomes an uncontrollable fire.
Viktor Bologan - Vadim Zvjaginsev Slovenia, 2011:
1. e4 e5 2. Nf3 Nc6 3. Bb5 f5 4. Nc3 fxe4 5. Nxe4 Nf6 6. Nxf6+ Qxf6 7. Qe2 Be7 8. Bxc6 bxc6 9. Nxe5 Qe6 10. d4 a5 11. Nd3 Qxe2+ 12. Kxe2 a4 13. Be3 d6 14. Kd2 Bf5
White has a kingside pawn majority (3 pawns vs. 2). If he manages to push his majority and creates a passed pawn, he wins. Black will use his unopposed light square bishop to frustrate this plan. The battle lines are drawn, and yet, as we'll see, I'm not sure military metaphors work so well here. 15. f3 Kd7 16. g4 Be6 17. Nf4 Bf7 18. h4 Rhf8 19. h5 Bc4
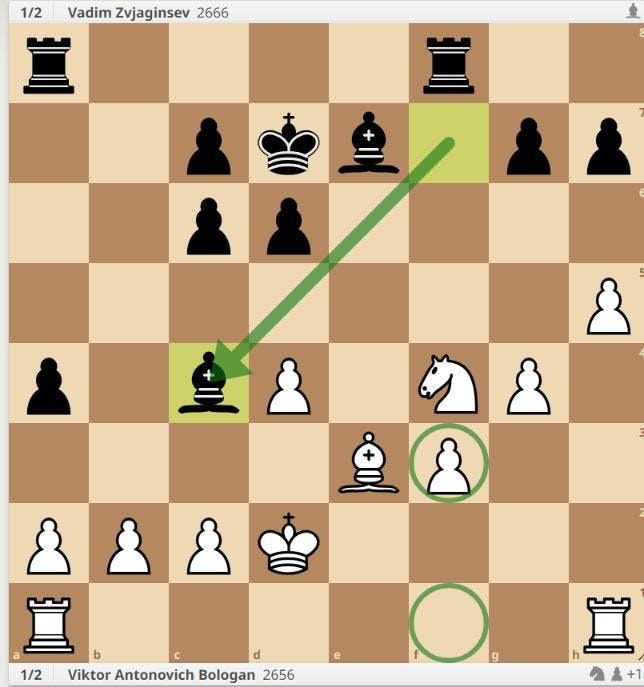
What's this about? Well, White hopes to eventually push his f-pawn. To do that he would like a rook on f1. 19... Bc4 controls the f1 square and asks white to weaken his queenside pawns with 20. b3. 20. b3 Ba6 21. Rh3 White plays a prophylactic move of his own. It often helps to think of chess as like a dance as much as a battle. There's a harmony underlying a well-played game; a logical thread of to-and-fro more musical than military that most of us struggle to hear. Black might be dictating terms to white, but both sides must anticipate where the other is going next. White knows black will hope to control the a-file after an eventual ab ab. He also knows the black bishop will probably go to b7 to threaten ...c5 and an attack on f3. So white uses his 'free' move to protect f3.
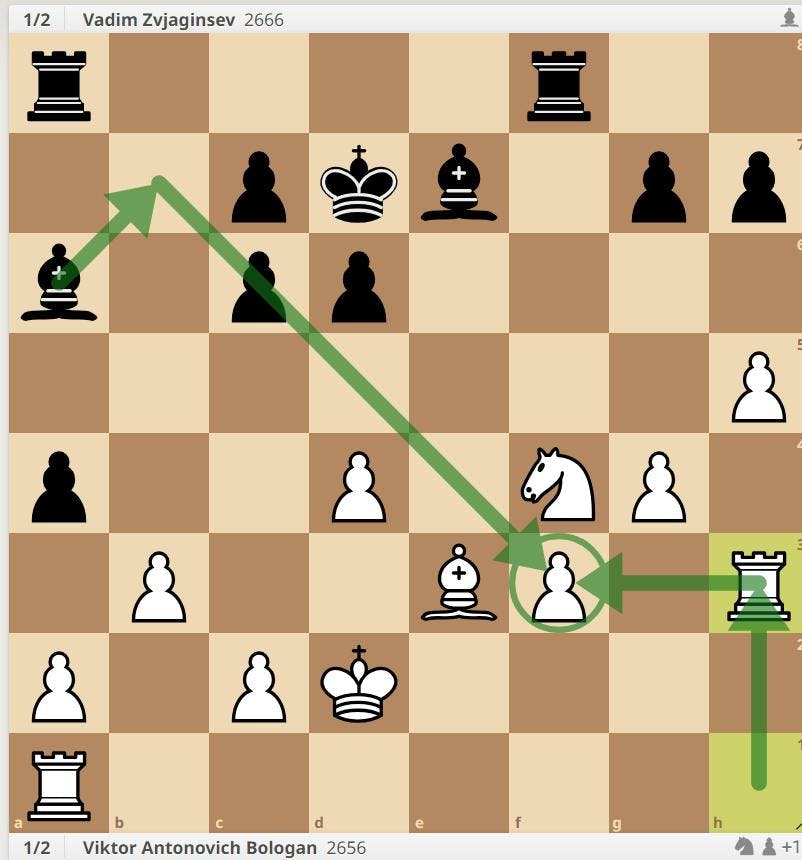
21... Bb7 22. Rf1 Every move necessarily a consequence. Black renounces control of f1 in order to open the f-file, white renounces the a-file in order to get behind the f-pawn. axb3 23. axb3 Bc8!
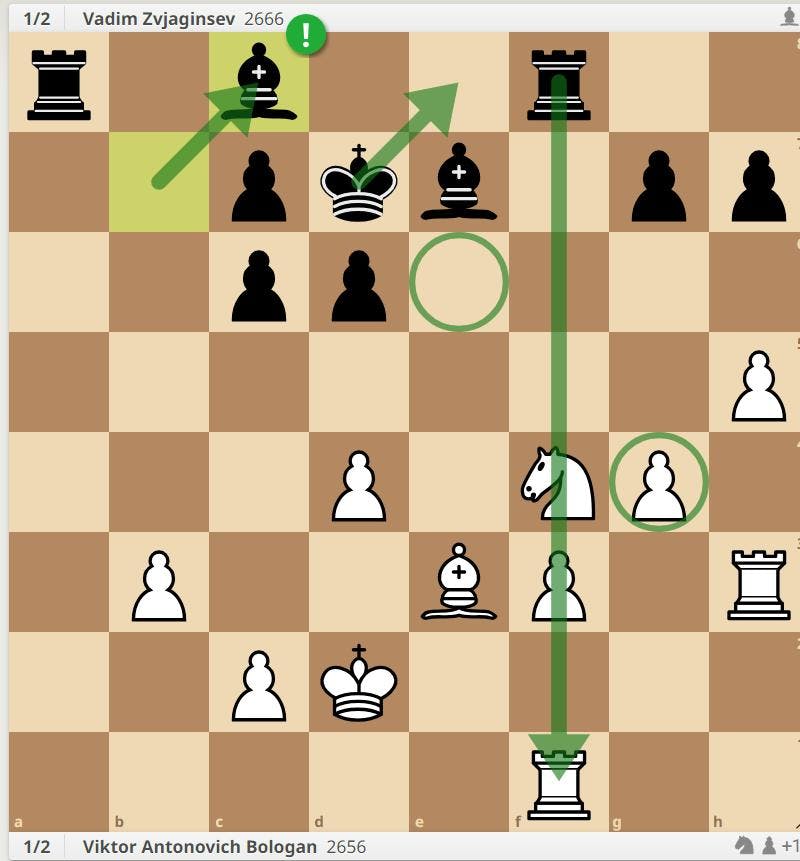
Another prophylactic move, emphasising white's difficulty in mobilizing his pawn majority. Black will move his king and not only will the bishop on c8 prevent white's majority from advancing, it will both control e6 and also threaten to exploit an eventual pin on the f-file with Bxg4 when the white knight moves. 24. Nd3 So the knight moves first. But on d3 it is ideally placed to kick out an invading black rook on a2. Ke8 25. Rg3 Protecting g4 and preparing to return to the back rank to join its partner in combatting the black rooks on the a-file. Ra5
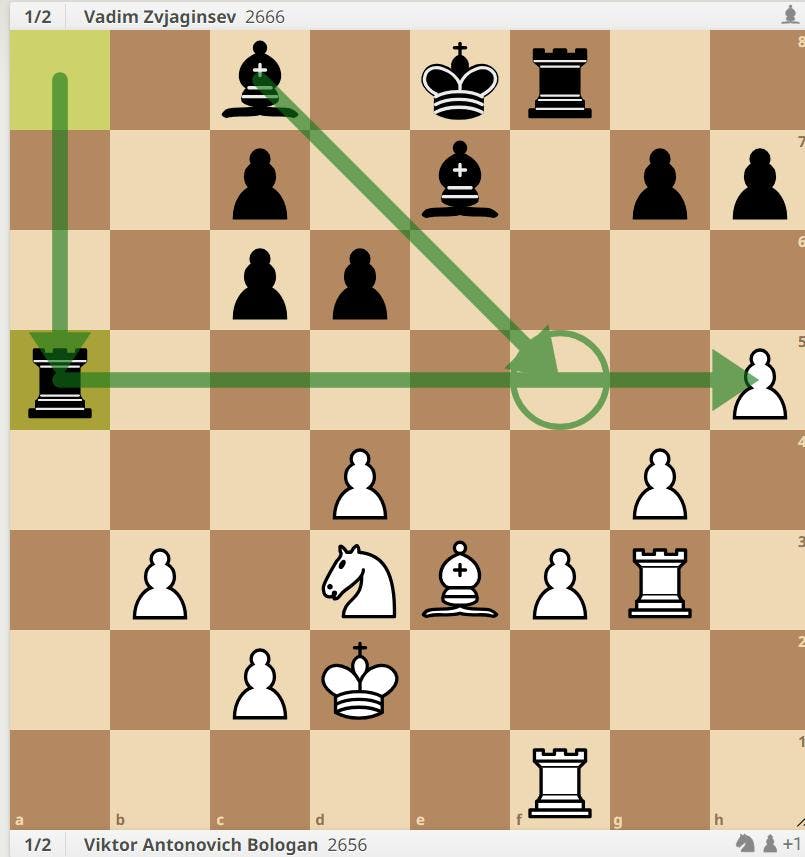
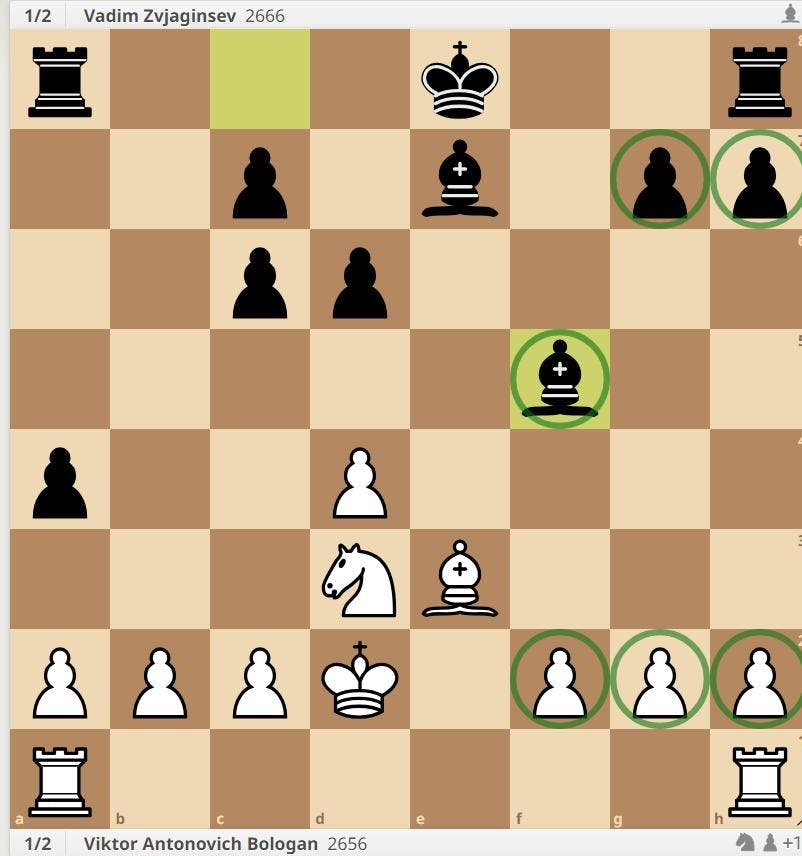
Laterally preventing any kingside push. 26. Rgg1 Be6 27. Ke2 Kd7 28. Ra1 Rfa8 Black keeps the a-file, white slowly but surely prepares to push his f-pawn. 29. Rxa5 Rxa5 30. Bd2 Ra2 The a-file distracts white from his job on the kingside. 31. Nb4 Back goes the black rook. Ra8 32. Bc3 Re8 33. Kf2 Bh4+ Another annoyance designed to impede the majority. 34. Kg2 Bd5!

This move is, for me, the icing on the cake. It demonstrates the flexibility of mind and awareness of the full potential of a good piece required of a strong player. An aspect of the power of the unopposed bishop is in its potential offering up for exchange on its owner's terms. The white kingside majority prevented from advancing, the bishop's job is done. The extra pawn is neither here nor there. Black's active rook means that it's white who must play well to draw. 35. Kh3 Bg5 f-pawn restrained. 36. Nxd5 cxd5 37. Re1 Ra8!

No exchange. White still has an extra pawn. The dance continues. 38. Re2 Ra2 39. Be1 Bf6 40. Bf2 Ra1 41. f4 Finally, the f-pawn advances. But such is black's pressure on the d-pawn, white must play more weakening pawn moves. Rd1 42. c3 h6 43. Kg2 Rc1 44. Re3 c5!
More pressure. Now white must trade down into a rook and pawn ending where, again, such is the activity of the black rook, white's extra pawn is irrelevant. 45. Rg3 Bh4 46. Rh3 Bxf2 47. Kxf2 Rc2+ 48. Ke1 { 1/2-1/2 The game is a draw. } 1/2-1/2
Though our focus was on black and black's initiative in this game, and how it was used to anticipate and frustrate white's plans, note also how white had to think and respond in similarly prophylactic terms. As impressive as black's play was a pawn down, consider how impressive white's play to draw a pawn up! White always appeared one vital move short, yet he still managed to keep the balance.